In today’s digital age, our iPhones have become our go-to devices for capturing and storing precious memories in the form of photos. However, as our photo libraries grow, it becomes crucial to have a reliable backup solution to ensure the safety and security of our valuable memories. One such solution is to back up iPhone photos to Synology NAS (Network Attached Storage). Synology NAS devices offer ample storage capacity and advanced features that make them an excellent choice for storing and organizing your photo collection. In this article, we will guide you through the process of setting up a Synology NAS on your PC and using a powerful tool called FoneTool to back up your iPhone photos to the NAS.
Step 1. Set Up Synology NAS on PC
Before you can start backing up your iPhone photos to a Synology NAS. As a user, you have the convenience of storing files directly to your Synology NAS using Windows Explorer. To accomplish this, it is imperative to map an Internet location with Windows Explorer beforehand. This crucial step enables smooth and efficient file management on your Synology NAS.
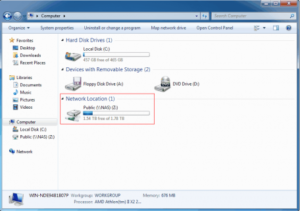
- Open a Windows Explorer window and go to Computer > Click Map network drive.
- When a window prompts, choose a drive letter as you like. In the Folder field, give the name of your Synology NAS and shared folder name preceded and separated by backslashes.
- Enter your DSM username and password and click OK. Finally, a Windows Explorer appears.
Upon successfully mapping your shared folder, you can easily access and navigate it within the “Computer” section of your system.
Step 2. Backup iPhone Photos to Synology via FoneTool
To simplify the process of backing up your iPhone photos to the Synology NAS, we will use FoneTool, a versatile and user-friendly iOS data management tool. Before the simple steps, let’s have an overview of the key benefits of FoneTool:
All-in-One Solution
FoneTool offers a complete solution for iPhone backup, including photos. It allows you to selectively back up your photos or perform a full backup of all your photos, ensuring that no precious memories are lost.
Flexibility and Customization
With FoneTool, you have the flexibility to choose the specific photos you want to back up. You can select individual photos or entire albums, giving you control over what gets backed up.
Fast and Efficient
FoneTool is designed to provide a fast and efficient backup process. It utilizes advanced technology to optimize backup speed, ensuring that your photos are backed up quickly without compromising quality.
Secure and Reliable
FoneTool ensures the security and reliability of your photo backups. It employs robust encryption algorithms to protect your data during the backup process, keeping your photos safe from unauthorized access.
Now, free download FoneTool and complete the iPhone photo backup process in three simple steps.
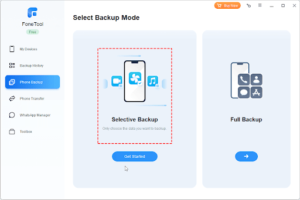
Step 1. Connect your iPhone to your computer > Click Phone Backup on the homepage of FoneTool > Mouse over to Selective Backup and click Get Started.
Tip: For an alternative option, you can utilize the iPhone to PC feature of Phone Transfer to transfer photos, music, etc. from iPhone to Synology NAS directly. By doing so, you can effortlessly browse and edit these files on your computer, enhancing your overall file management experience.
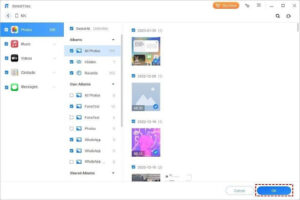
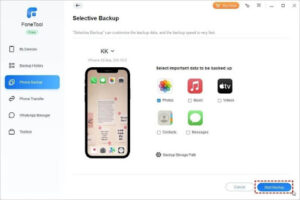
Step 2. Click the Photos icon to preview and select the wanted photos to back up to Synology > Click OK to continue. As you can see from the image below, you can also back up wanted music, videos, contacts, and messages at the same time.
Step 3. Change the storage path to the network location of your Synology NAS > Click Start Backup to complete the task.
It’s easy to restore the backup, just head to the Backup History page in FoneTool to locate the backup file, and that’s it.
Conclusion
Backing up your iPhone photos to a Synology NAS provides a secure and reliable solution for preserving your cherished memories. By following the step-by-step instructions provided above, you can easily set up your Synology NAS on your PC and utilize the powerful features of FoneTool to back up your iPhone photos effortlessly.
With the combination of Synology NAS’s robust storage capabilities and FoneTool’s intuitive interface. You can ensure the safety and accessibility of your photo collection, giving you peace of mind. Take the proactive step of backing up your iPhone photos to a Synology NAS today and safeguard your precious memories for years to come.